

Ready to contribute a project of your own to the Clarofy community? Your first step is to determine what type of project it will be. With Clarofy you have the option to create a text-based Quick Post, Write an Article, Create A Software Simulation or Screen Cast, Share Learning, an Image, Video, or URL. Continue reading below to learn how to create each of these projects.
Note: You must be logged in to contribute to Clarofy.
Create a quick post or article:
- From the navigation bar at the top of the page, select the Contribute button. Contribution options will display.
- Click Quick Post or Write an Article. If you chose Write an Article then the Select a Template modal will open where you can choose a temple. The article editor will open in draft mode.
- From here you can input a Title in the first text field, a Subtitle in the second, and the Body text in the third. You do not need to input text in all of these fields. If you choose to leave a field empty, the default text will not be displayed in the final product. If you chose a template with an image or video placeholder, you can click the Change button (represented by a left pointing arrow over a right facing arrow) on the bottom-right corner of the placeholder. For images this will open a modal where you can drag and drop a new file—if you want to remove the image element entirely, you can click Remove Image. For video this will open an Enter Embed Code modal where you can replace the existing code with your new code then click Save Embed—if you want to remove the video element entirely you can click Remove Embed.
- If you want to add an element, click the Add button (represented by a +) below the text fields. This will open the Add Element modal where you can choose from a variety of text elements, media elements, etc.
- When you are done creating your post, you can choose:
Cancel: This will discard your new post. You cannot undo this action.
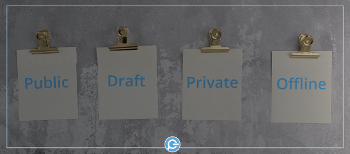
Save Draft: Allows you to save work in draft mode so that only you (and anyone with whom you’ve shared a link) can see the post. You can come back to it at anytime to edit and publish the post.
Publish: Allows you to access the Publish Settings where you can change the project permissions, categories, tags and language.
Create a software simulation or screen cast:
- From the navigation bar at the top of the page, select the Contribute button. Contribution options will display.
- Click Software Simulation. The Create and Share a Software Simulation or a Screencast modal will open. Select either Create Software Sim or Create Screen Cast.
- If you have the Clarofy application installed on your local computer, you will be prompted to Open Clarofy, click Open Clarofy.
Note: you can select the box that always allows the opening of the application to skip this step in the future. - If you do not have the Clarofy application installed on your local computer, Click the Download Clarofy button.
- If you are not already logged into the application, you will be prompted to do so now. The Clarofy application will now open and you can record your simulation or screen cast. For information on recording, editing, etc. of your simulation or screen cast in the application, please refer to the training guide. ***will insert a Clarofy Training Guide here once we have one.
Share Learning:
- From the navigation bar at the top of the page, select the Contribute button. Contribution options will display.
- Click Learning. The Share a Link to a Published dominKnow|ONE web package editor will open in draft mode.
- From here you can paste a URL of a Flow or Claro web package.
- Click the downward arrow to the right of Draft to change the permissions from the default.
- You can also assign the learning to a category by clicking the Categories button to the right of the permissions menu. Select the desired category and click Save.
Share Images:
- From the navigation bar at the top of the page, select the Contribute button. Contribution options will display.
- Click Image. The Share Images editor will open in draft mode.
- From here you can either drag image files from your desktop and drop them onto the designated area, or click the Upload Files button and select the desired files then click Open. The images will appear above the designated drag area with an X in the upper-left corner of each image (to delete images) and Caption input boxes so you may input descriptive text.
- You can also share images via URL. Input the image url into the Image URL text field and click Link Image.
- From the Display Information section input a Title for the images and Description.
- Click the downward arrow to the right of Draft to change the permissions from the default.
- You can also assign the images to a category by clicking the Categories button to the right of the permissions menu. Select the desired category and click Save.
- If you’d like to change the language from the default English (United States) then click the downward arrow to the right of the menu and select a new language.
- Click Save when you’re done.
Share a video:
- From the navigation bar at the top of the page, select the Contribute button. Contribution options will display.
- Click Video. The Share Video editor will open in draft mode.
- Input a URL from Youtube, Vimeo or TED in the first text field.
- Input a Description in the second text field.
- Click the downward arrow to the right of Draft to change the permissions from the default.
- You can also assign the images to a category by clicking the Categories button to the right of the permissions menu. Select the desired category and click Save.
- If you’d like to change the language from the default English (United States) then click the downward arrow to the right of the menu and select a new language.
- Click Save when you’re done.
Share a link:
- From the navigation bar at the top of the page, select the Contribute button. Contribution options will display.
- Click Link. The Share a Link editor will open in draft mode.
- Input a website URL in the first text field.
- Input a Description in the second text field.
- Click the downward arrow to the right of Draft to change the permissions from the default.
- You can also assign the images to a category by clicking the Categories button to the right of the permissions menu. Select the desired category and click Save.
- If you’d like to change the language from the default English (United States) then click the downward arrow to the right of the menu and select a new language.
- Click Save when you’re done.


Comments ( 0 )
Sign in to join the discussion.