Publishing Profiles have settings to control both pre- and post-testing behaviors.
By default, pre-testing is off.

Publishing Profiles have settings to control both pre- and post-testing behaviors.
By default, pre-testing is off.
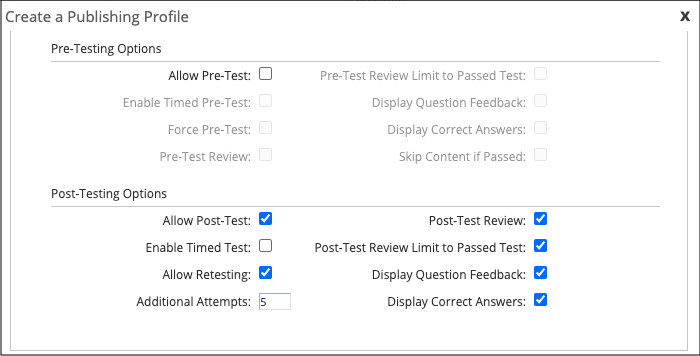
Some general things to know when planning for pre-testing:
There are typically two design reasons that people want to use pre-testing for:
Let’s look at how to set up each of these use cases.
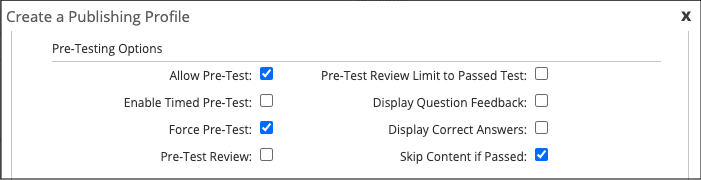
If you want to give learners a pre-test that allows them to test out of the course content if they achieve the pass score, in the Publishing Profile:
You can also choose to set any of the other pre-testing options that control reviewing the pre-test.
This use case has a few more steps.
This is because the SCORM standard doesn’t actually account for pre-testing vs post-testing, it just tracks scores from tests. In other words, SCORM doesn’t have a way to track whether the test was delivered before or after the content.
The result of this is that LMS can’t actually report on pre-testing and post-testing as separate events or scores. If the learner scores 40% on the pre-test, that score is stored in the LMS as the course test score. And when the learner scores 85% on the post-test, that new score replaces the earlier 40% score in the LMS.
The result is that you actually need two separate courses or events in the LMS in order to be able to track pre-test and post-test scores separately.
In dominKnow | ONE we’ve done our best to make this as simple as possible, though.
And for this use case, you don’t even use the pre-test settings in the Publishing Profile at all.
Instead, you'll create one Project and publish it twice to use as the pre-test and as the full course with post-test.
To start, build your project with all of its content pages and its test questions. Create a Publishing Profile to set the post-test options that you want or need to meet your design needs.
Then, make a Share copy of your project and set it to be an Assessment. To do this:
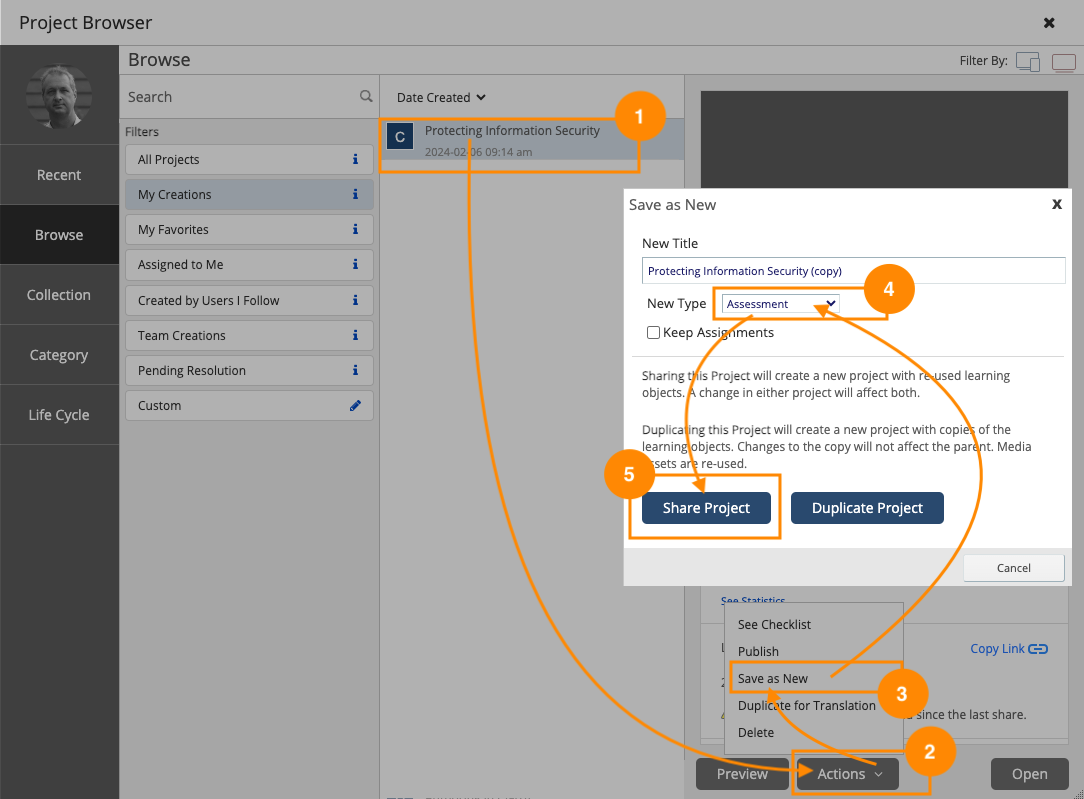
For this Project, create a new Publishing Profile that has 0 additional attempts set in the post-test settings. This means the learner won’t be able to re-take the test for this Project. Leave the pre-test setting as all unchecked.
Next, publish each of these Projects for your LMS and set them up as a learning path or curriculum (or whatever terminology your LMS uses) so that the learner takes the assessment-only Project first then takes the full course version of the Project with its post-test as the second event.
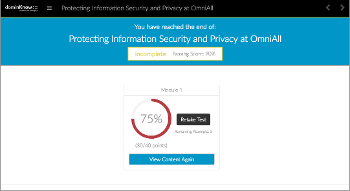
Your learner will launch the first project and be given only the test questions, which will record a test score in the LMS.
Then they’ll launch the second Project, where they’ll work through the learning content then take the post-test, recording a score in the LMS.
This way you’ll have two separate events in your LMS with test scores to be able to report on. How to do that reporting will vary depending on your LMS's features and options.

dominKnow | ONE has a great range of options for working with variables. Here are the starting points you need to know.
.png&id=eaebc3b0)
Use your content beyond the LMS with the publishing options available in dominKnow | ONE

Question Pages and Inline Quiz components: different ways to add and use questions in any Project

Themes, Baselines, Publishing Profiles, Publish Targets and Reports

NEW START TIME FOR MARCH! Wednesdays at 2 CET / 1 GMT / 9 EDT

Collections and Categories, Lifecycles, Publishing Checklist, Metadata

Authoring interface changes, new authoring features headline the list of hundreds of overall changes in dominKnow | ONE 7.4
A quick and easy way to provide a list of choices to a learner

Comments ( 0 )
Sign in to join the discussion.