Change to a different interaction, add extra modifying keystrokes and more

Capture records how you interact with a software tool as you record your lesson. And in most cases, it captures exactly what you need.

But there may be some cases where you need to tweak or even fully change what you're asking the learner to do on a specific step.

Or, maybe you don't have access to the software tool to do a recording using Capture and have to create a lesson using imported screen captures. 

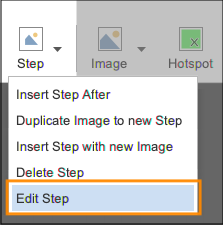
In these cases you can choose the Edit Step option to change or set up the step interaction:   


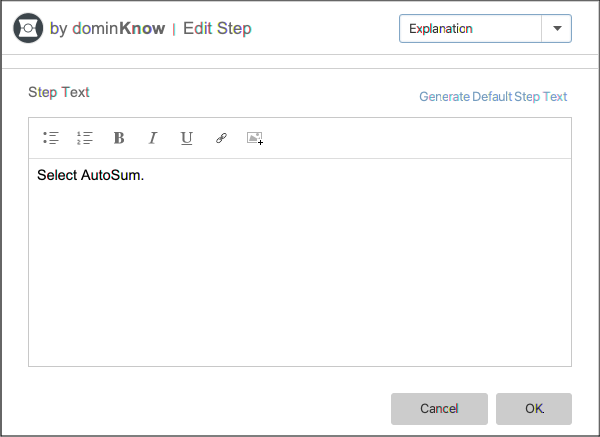
This opens the Edit Step panel:


The Target Field, Default Step Text and the Generate Default Step Text button

The Edit Step panel's Target field is connected to the default information collected when you recorded your Capture file.

And it is affected by the quality of that data, especially if you are recording a web-based software tool in Chrome.

Here's an example of how it works.

Let's say that the first step in your lesson is to click on a button named "Start".

When you finish your recording the default Step Text for step 1 is shown as "Click on Start" because Capture was able to identify the action as as well as the name of the button.

If you do not change the Step Text, when you open the Edit Steps panel you'll see the Target field says "Start", and the Step Text field says "Click on Start". If you change the text in the Target field to "BEGIN" then click the Update option above the Step Text field, the Step Text will change to "Click on BEGIN". 

So, the Target field is helpful if you are using the default Step Text generated by the capture process.

If you are using the default Step Text, in addition to updating any changes to the Target field, the Update button will also change the text for the action in the Step Text.


What if you've changed the Step Text?

If you change the Step Text to "Slam that Start button!" then open the Step Edit panel, you'll see that the Target field would say "Start" and the Step Text would say, "Slam that Start button!".

If you now change the Target field to "BEGIN" then click the Update option above the Step Text field or click the OK button, the Step Text will change to "Click on BEGIN" -- it will change the name of the target in the Step Text but also revert back to the rest of the default Step Text.


What if the Target Field is empty?

If the Target field is empty when you open the Edit Steps panel, it is because the recording process was unable to successfully gather what the target was as you made the recording. This commonly happens if you are recording a web-based software tool in Chrome.

When Capture is recording a lesson for a tool that is browser-based it relies on the browser's accessibility features to help determine items like the names of buttons or other functions you interact with in the tool. Different browsers have different levels of support for accessibility, which in turn affects the success of your Capture lesson's recording process. Chrome is the most challenging, and to use Chrome as the browser being recorded for a Capture file you have to turn on the accessibility features (Chrome has them off by default).

Your Capture recordings will have the best information if the tool or application you want to Capture is open in Edge for Windows or Safari for Mac. 
In the upper right of the Edit Step panel is a drop down list that will show what interaction the step is currently set to. 

Here's a rundown of each of the available interaction options and their respective settings.

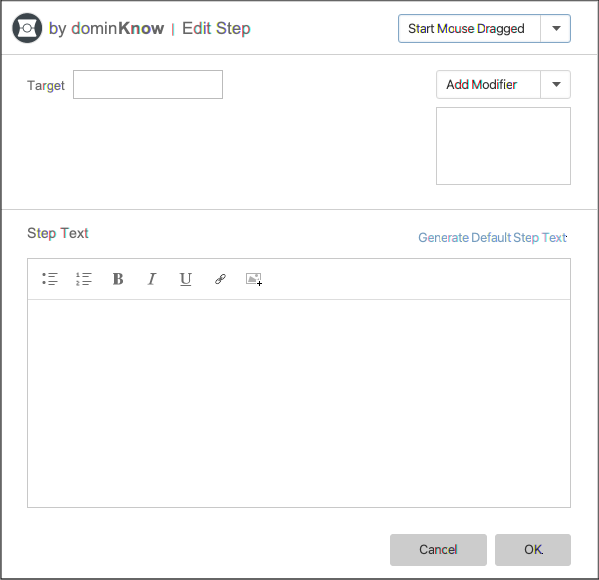
Start Mouse Dragged - Settings

If you are setting up a Start Mouse Dragged interaction, you have these settings and options available:

  1. Target
  2. Add Modifier: Allows you to add additional context to the interaction, such as holding down the Shift key (as has been added in the image for a Mac user, display will be different on Windows). When you make a selection from the Add Modifier drop down, it is shown in the display panel below the list. You can add more than one modifier. To remove a modifier, roll your mouse over it and select the red X (as shown above).

You can also edit the Step text.

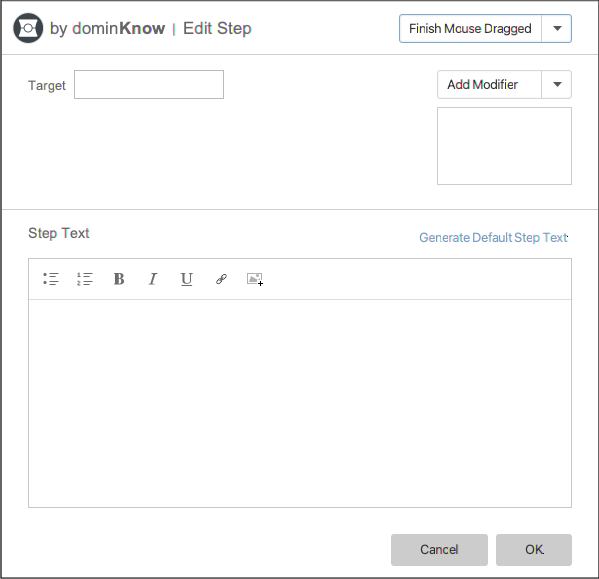
Finish Mouse Dragged - Settings

If you are setting up a Finish Mouse Dragged interaction, you have these settings and options available:

  1. Target
  2. Add Modifier: Allows you to add additional context to the interaction, such as holding down the Shift key (as has been added in the image for a Mac user, display will be different on Windows). When you make a selection from the Add Modifier drop down, it is shown in the display panel below the list. You can add more than one modifier. To remove a modifier, roll your mouse over it and select the red X that will be displayed.

You can also edit the Step text.

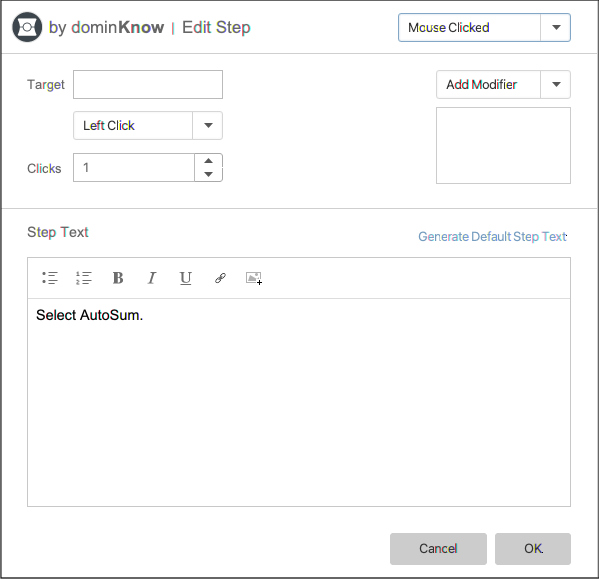
Mouse Clicked - Settings

If you are setting up a Mouse Clicked interaction, you have these settings and options available:

  1. Target
  2. Mouse Button options: Options include Left Click, Right Click, Middle Mouse, Button 4 and Button 5
  3. Number of Clicks: Up to 5
  4. Add Modifier: Allows you to add additional context to the interaction, such as holding down the Shift key (as has been added in the image for a Mac user, display will be different on Windows). When you make a selection from the Add Modifier drop down, it is shown in the display panel below the list. You can add more than one modifier. To remove a modifier, roll your mouse over it and select the red X that will be displayed.

You can also edit the Step text.

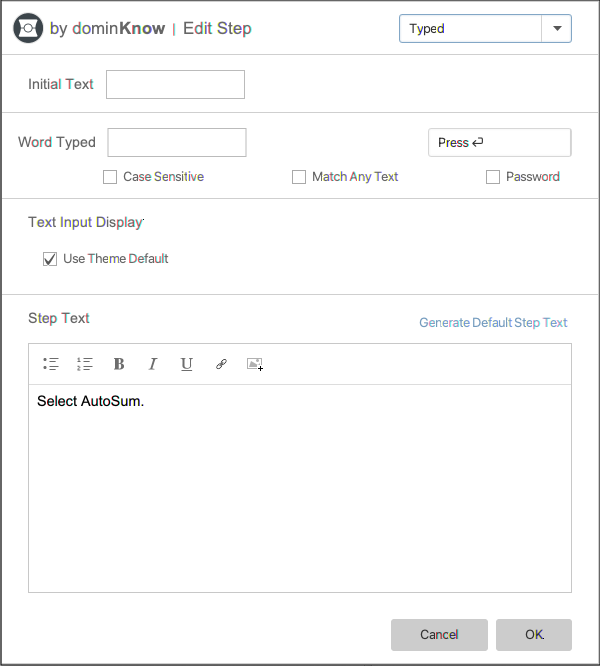
Typed - Settings

If you are setting up a Typed interaction, you have these settings and options available:

  1. Word Typed: For Try Me mode and when the lesson is used as a Question, this is what the learner must type 
  2. Step completion criteria: This is what the learner will need to do to indicate they are finished typing. Options include Press Return (Enter), Press Tab Key, Move Mouse, Capture Stopped. The Capture Stopped option will be shown if the step you recorded used the same keyboard actions as the shortcut keys set to stop the Capture recording. 
  3. Case Sensitive checkbox
  4. Match Any Text: If selected, the learner can type any text into the field (text does not get checked)
  5. Password: Will show *** as the learner types, to emulate a password field

The Use Theme Default check box sets the lesson to use the dominKnow | ONE Project Theme settings to control and style the display of the text in this interaction when the lesson is added to a Claro or Flow page.

If you deselect this check box, you can control the display settings in the Capture file itself, such as background color, font family, font size and font color. If a font doesn't exist in the learner's browser, the setting will roll back to the default font.   

You can also edit the Step text.

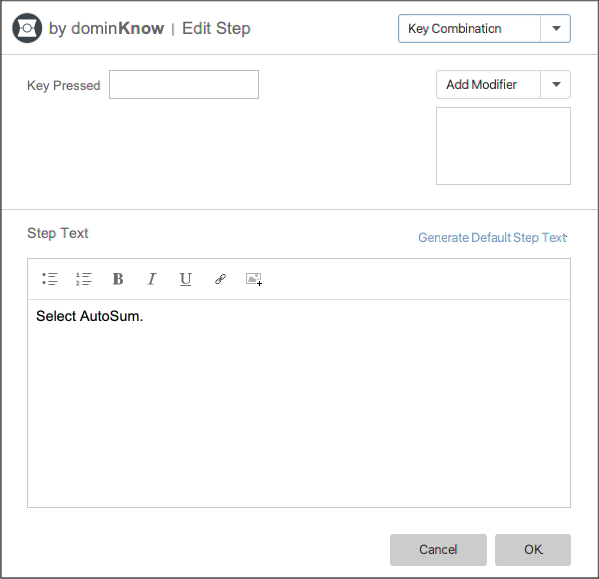
Key Combination - Settings

If you are setting up a Key Combination interaction, you have these settings and options available:

  1. Key Pressed 
  2. Add Modifier: Allows you to add additional context to the interaction, such as holding down the Shift key. When you make a selection from the Add Modifier drop down, it is shown in the display panel below the list. You can add more than one modifier. To remove a modifier, roll your mouse over it and select the red X that will be displayed. 

You can also edit the Step text.

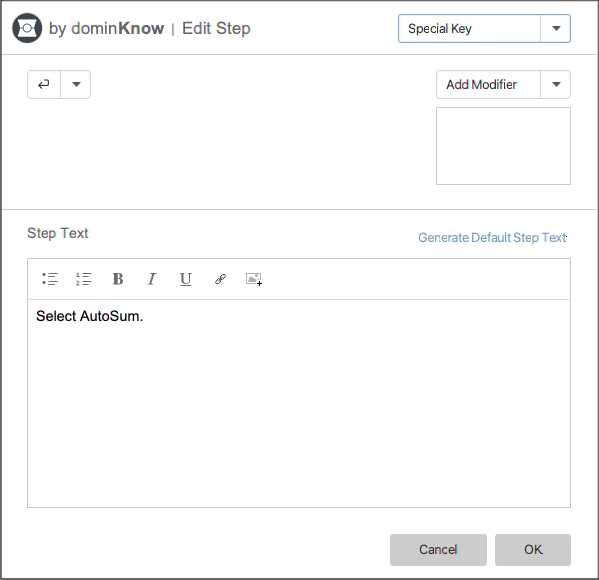
Special Key - Settings

If you are setting up a Special Key interaction, you have these settings and options available:

  1. Key Pressed: Options are Backspace, Return/Enter, Tab, Delete 
  2. Add Modifier: Allows you to add additional context to the interaction, such as holding down the Shift key. When you make a selection from the Add Modifier drop down, it is shown in the display panel below the list. You can add more than one modifier. To remove a modifier, roll your mouse over it and select the red X that will be displayed. 

You can also edit the Step text.

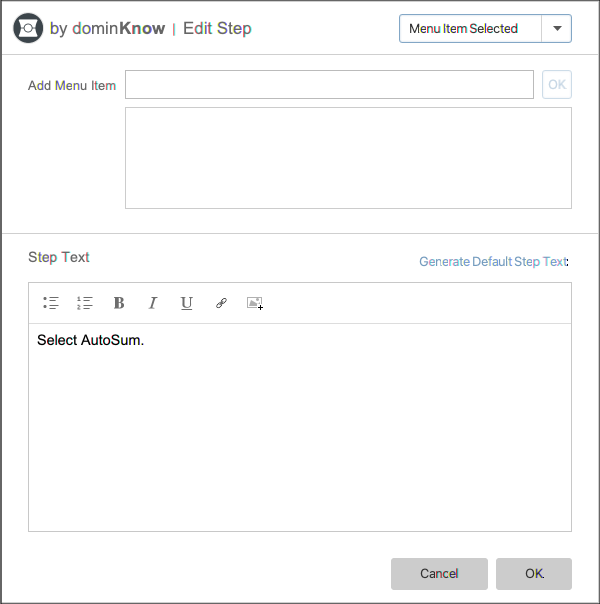
Menu Item Selected - Settings

If you are setting up a Menu Item Selected interaction, you have these settings and options available:

  1. Add Menu item: Type the text for the menu item and select OK. The item you added will be shown in the display panel below. You can add multiple items. To remove an item, roll your mouse over it and select the red X that will be displayed.

You can also edit the Step text.

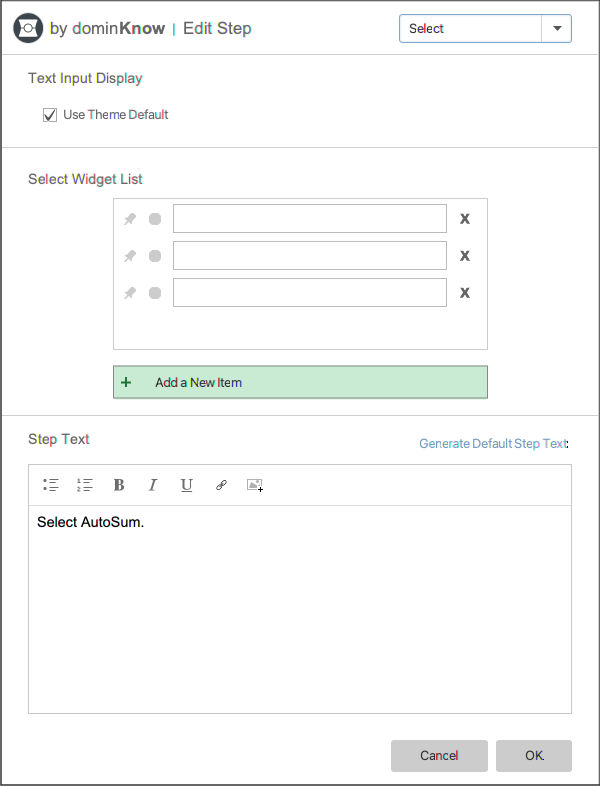
Select - Settings

The Select option lets you create a drop down menu interaction.

The Use Theme Default check box sets the lesson to use the dominKnow | ONE Project Theme settings to control and style the display of the text in this interaction when the lesson is added to a Claro or Flow page.

If you deselect this check box, you can control the display settings in the Capture file itself, such as background color, font family, font size and font color. If a font doesn't exist in the learner's browser, the setting will roll back to the default font.  

The Select Widget List area lets you add text for each item on the drop down list. Selecting a Pin icon will pin the selected item at the top of the list. The Circle icon lets you set which list item should be selected as correct.

You can also edit the Step text.

Explanation - Settings

The Explanation option allows you to add a step that is information-only for the learner.

You can edit the Step text.

Since this is not an interactive step, you should also remove the Hotspot from the image, if one is added.

In Try Me mode, the learner will see a Continue button to navigate past an Explanation step.

Explanation steps do not get shown to the learner in Test mode.  


  0     0

Similar Projects

Questions  ( 0 )